Stores and in-store sales
You can send purchases made in your stores to OneTrace.pro together with online data. A check from the register lands in the customer's profile next to their website visits, product views, and emails. This feeds the ROPO report: how many sales in stores were made by customers who researched a product online first. Segments and journeys can also use in-store purchases.
The section is Data → Stores. Roles with the permission to view products can open it, and roles with the permission to edit products can change the rule and the store list.
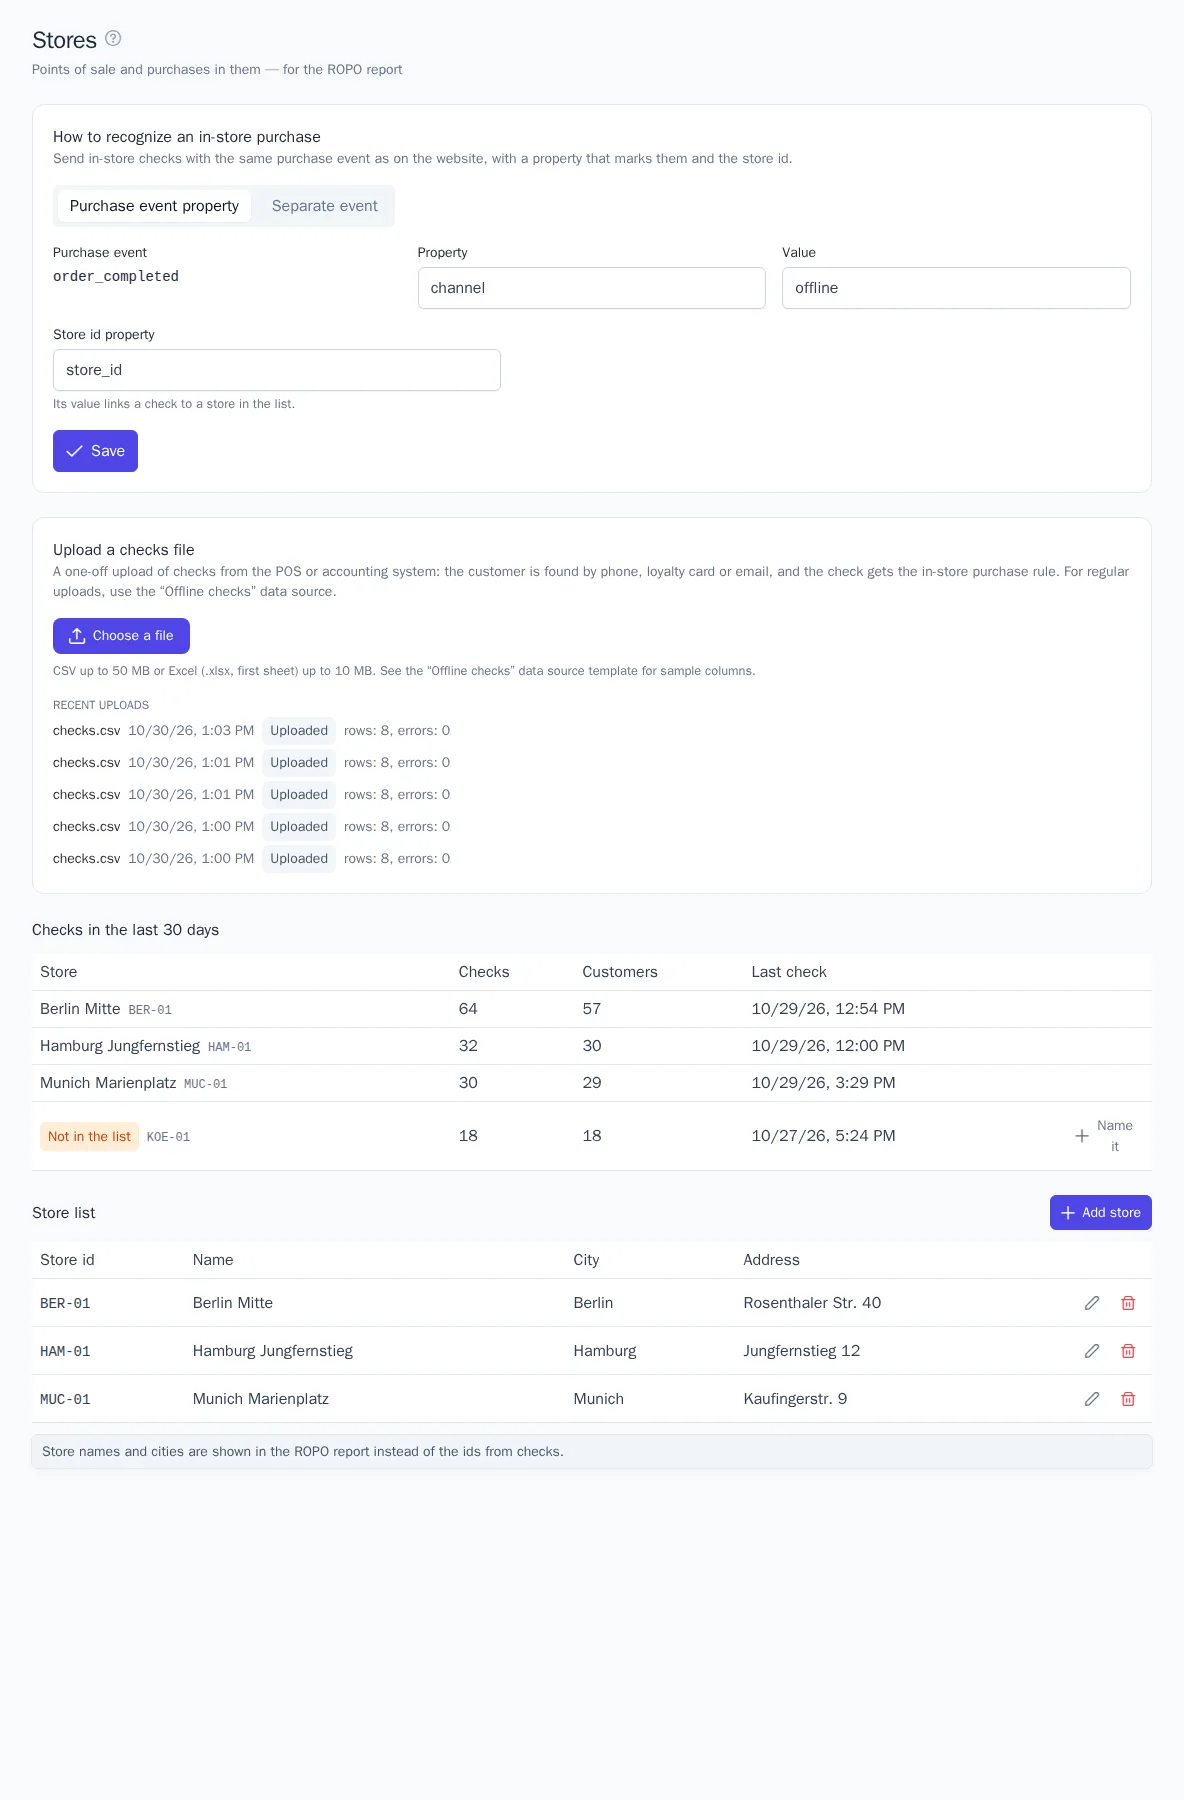
How to recognize an in-store purchase
A check from a store is the same purchase event as an order on the website, for example order_completed with an amount and items. For OneTrace.pro to tell it from an online order, the check has a separate property. You set the rule in the How to recognize an in-store purchase block:
- Purchase event property (default): the check is sent as a purchase event with the property
channelset tooffline. You can change the property and the value. The purchase event comes from the prediction settings. - Separate event: if checks already arrive as their own event, for example
store_purchase, choose it. - Store id property (
store_idby default) links a check to a point of sale in the store list.
The rule applies everywhere at once: the ROPO report, the segment condition, the journey trigger, and the checks file upload.
How to send checks
The customer of a check is identified by phone, email, or loyalty card number. If there is no profile with them yet, a new one is created. When the customer leaves the same phone or email on the website, the profiles are merged, and their online history is joined with their store purchases. See Profile merging. A check without a phone, email, or card can't be linked to online history, so it is useless for the report.
There are four ways:
| Way | When it fits |
|---|---|
| 1C extension | checks from 1C:Retail, 1C:Small Business Management, or 1C:Trade Management, automatically every 15 minutes |
| API | your own register or accounting system that can send requests |
| A data source with the Offline checks template | an export of checks that your system puts in a file every night. See Data sources |
| File upload | a one-time upload of checks for a past period, for example to see the report before the register is connected |
Whichever way you choose, sending the same check again within a day doesn't create a duplicate.
1C extension
A configuration extension for 1C:Retail 2.3 and 3.0, 1C:Small Business Management (UNF) 1.6 and 3.0, and 1C:Trade Management 11, on the 1C:Enterprise 8.3.21 platform or newer. The configuration isn't changed: everything is in the extension.
- Every 15 minutes, it sends new posted «Чек ККМ» documents (POS receipts): the date, number, store, amount, and items. The customer is the phone, email, and loyalty card from the check.
- Once a day, it sends the store list.
- A check without a customer is skipped and written to the event log with the reason. The other checks are sent.
- If OneTrace.pro is unavailable or the key is wrong, checks aren't lost: they go out on the next run.
If the Upload a checks file block has a the 1C extension link, it leads to the extension and its installation and setup guide. The extension needs a secret API key with the Upload and delete products permission: this permission is required for the store list. In the extension's settings data processor, enter the OneTrace.pro address and the key, test the connection, and save the settings.
A product in a check is sent by the item's article, code, or unique identifier. Choose in the settings the one that matches the product ids in the catalog. Otherwise, the ROPO report won't find the products that the customer viewed on the website.
API
Send a check as a track event with a secret key. The customer goes in context.traits, and userId isn't needed:
{
  "event": "order_completed",
  "messageId": "check-ber01-000123",
  "timestamp": "2026-10-29T15:04:00+01:00",
  "properties": {
    "channel": "offline",
    "store_id": "BER-01",
    "order_id": "000123",
    "amount": 89.90,
    "products": [{ "product_id": "SKU-1", "price": 89.90, "quantity": 1 }]
  },
  "context": { "traits": { "phone": "+49 151 2345 6789", "loyalty_card": "2770 0001 5002" } }
}
- The request is
POST /api/v1/track, and in a batch it isPOST /api/v1/batch. See Server integration. - Only requests with a secret key can find a customer by
context.traits. This doesn't work with a website write key: otherwise, a visitor could pose as someone else with their phone number. messageIdis a permanent check id, for example the store and the check number. A repeat with the samemessageIdis discarded.- If the customer is signed in to their account on the website and the register knows their id, send
userIdtoo.
Stores go to the store list with a POST /api/v1/stores request with the body {"items": [{"id": "BER-01", "name": "Berlin Mitte", "city": "Berlin", "address": "…"}]}: up to 1000 stores at a time, and a store with the same id is updated. You need the Upload and delete products permission.
Checks file upload
- In Data → Stores, click Choose a file in the Upload a checks file block. A CSV up to 50 MB or an Excel file (.xlsx, .xls, first sheet) up to 10 MB works. The first row has the column names.
- Specify what each column contains: check date and time (required), phone, loyalty card, email, or customer id (at least one column), store, check number, amount, and items. Columns with similar names are matched automatically. Skip the columns you don't need, and you can save the rest as check properties.
- Click Upload checks. The progress and row errors are shown on the page. Recent uploads are shown below the form.
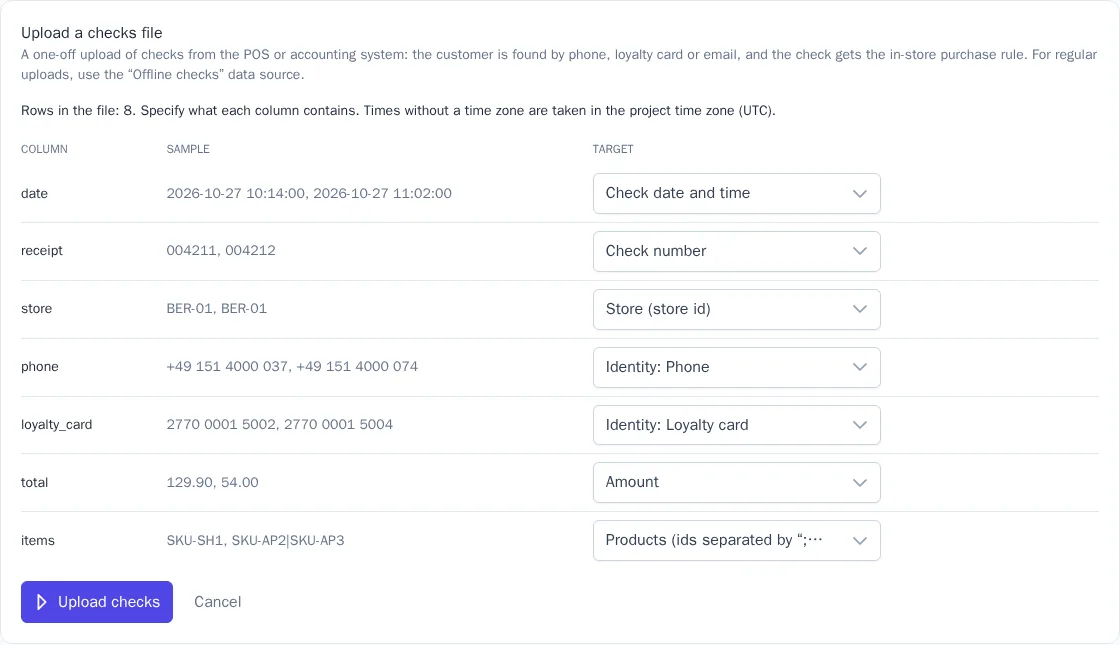
- A time without a time zone, for example
2026-10-28 18:42or28.10.2026 18:42, is taken in the project time zone: a register usually writes local time. - Items in one cell are separated by
;,,, or|. - Each row becomes a check by the in-store purchase rule. A row without a customer is skipped with an error.
- The upload is available to roles with the permission to edit profiles. Uploaded checks count towards the plan's monthly event quota.
Store list
The store list gives points of sale readable names in the ROPO report instead of the ids from checks. A store has a Store id (the store_id value in checks), a Name, a City, and an Address. You can add a store with the Add store button, through the API, or with the 1C extension.
The Checks in the last 30 days block shows how many checks and customers each store had and when the last check came. A store that isn't in the list is marked "Not in the list", and the Name it button adds it. If you delete a store, its checks stay, and the report shows the id instead of the name.
Segments and journeys
- The In-store purchase segment condition selects store customers for the last N days. The "Online touches before the check" field has the options Any, After an online touch, or Without online touches. You can choose the touch window, the kinds of touches, and a store. See Segments.
- The In-store purchase journey trigger starts a journey for every check from a store. You can limit it by store and a minimum amount, for example to ask for a store rating or to offer items to go with the purchase. See Journeys.