File imports and data sources
If your customers already live in another system, such as a CRM, accounting software, or a spreadsheet, you don't have to wait for them to show up on your website: upload a file. Import handles one-time profile uploads from CSV, and data sources regularly load profiles and events from a file at a URL, in S3, or in a Google Sheet.
Both tools are available to Owner, Administrator, and Manager.
Import profiles from CSV
Open Data → Profile import in the menu, or click Profile import in the header of the Profiles page.
File requirements
- CSV with column headers in the first row.
- Comma, semicolon, or tab separator: detected automatically.
- Up to 20 MB.
- At least one identifier column: the customer ID in your system, email, or phone.
Example:
email;phone;First name;City;customer_id;bonus
[email protected];+1 555 123-4567;Anna;Boston;1001;350
Upload a file
- Click Choose a CSV file and select the file.
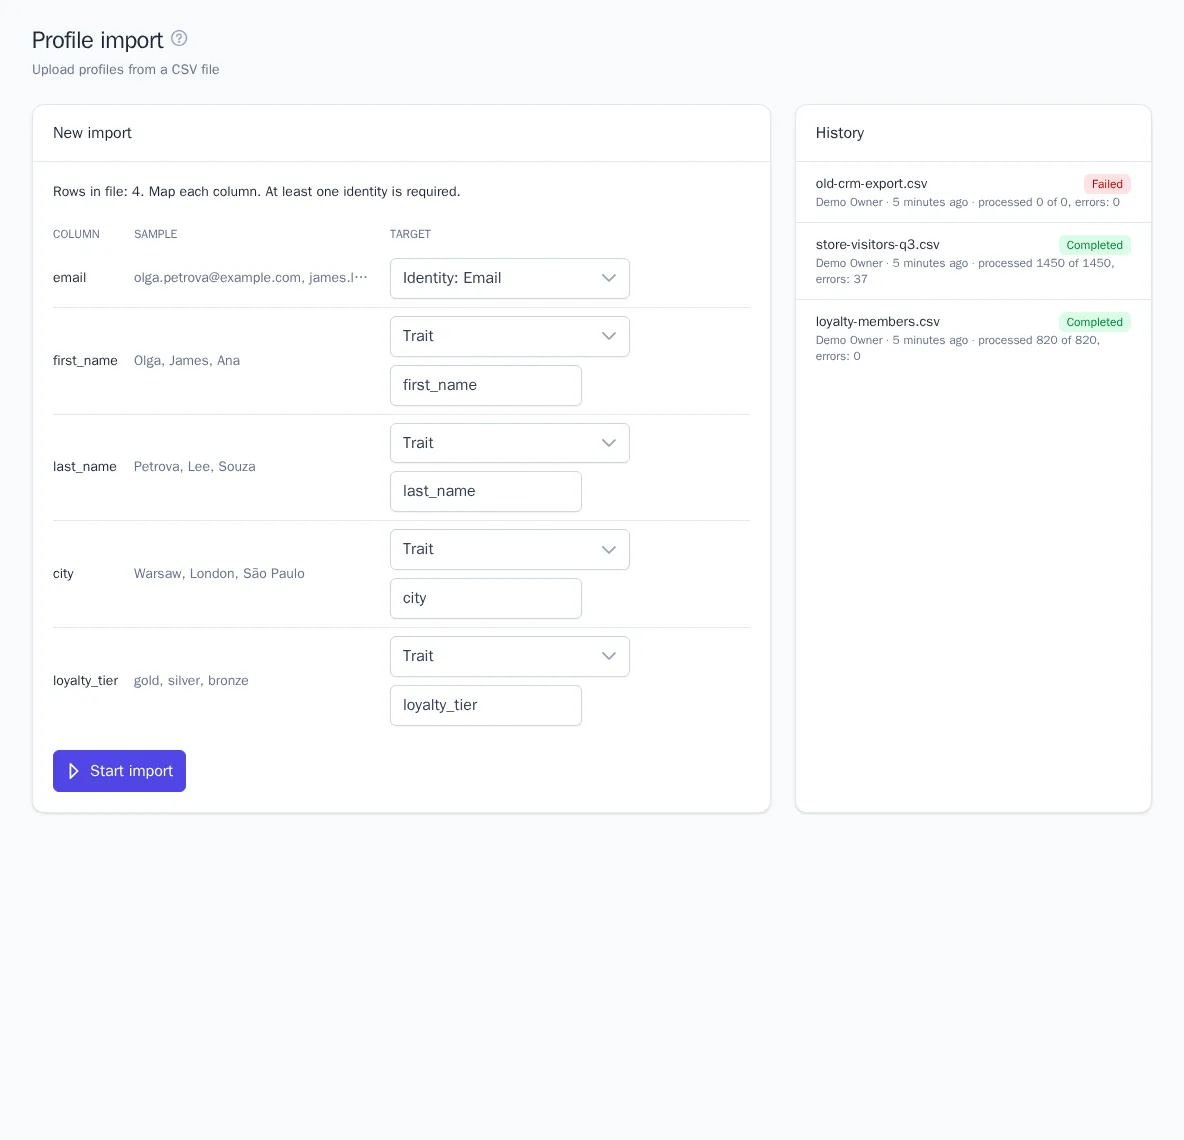
- The table shows the file's columns, sample values, and a Target field. For each column, choose:
- Identity: User ID, Email, Phone, or Anonymous ID: the profile is found or created by this value. You can choose each type only once.
- Trait: a profile property; enter a key in Latin letters next to it, for example
cityorbonus_balance. - Skip: the column isn't imported.
- Click Start import.
OneTrace.pro suggests a target based on the headers: email maps to email, phone and mobile to phone, customer_id and user_id to User ID. Other headers become trait keys in lowercase with underscores: "First name", "Last name", "City", and "Country" become the traits first_name, last_name, city, and country. Check the suggestions before you start.
Import progress
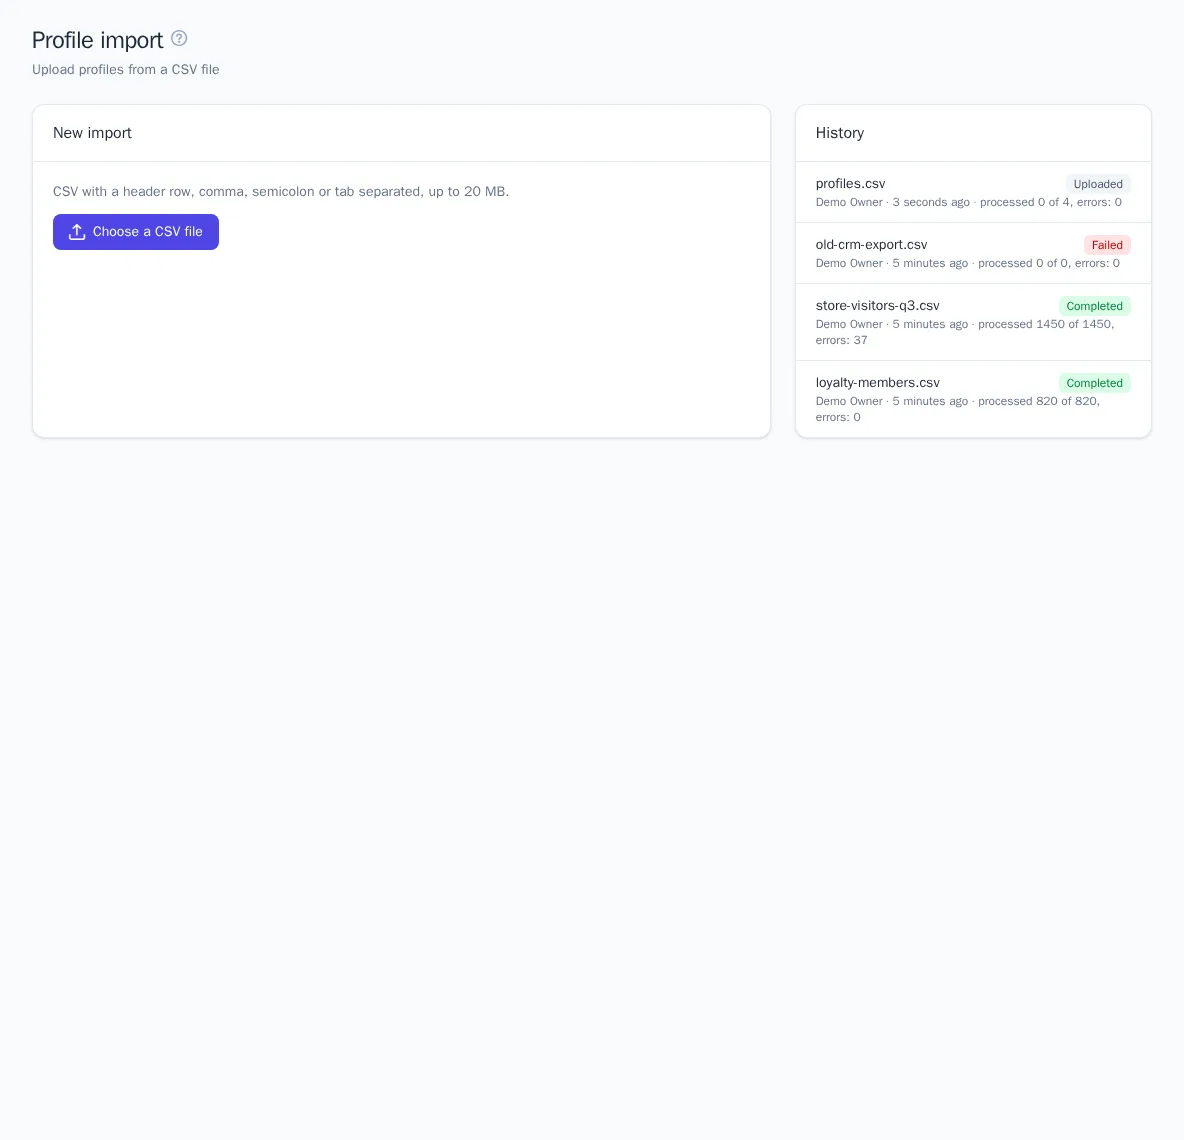
The import runs in the background: the page shows a progress bar, the status, and a counter like processed N of M, errors: K. You can close the page and the import will continue. Rows with errors are listed with their numbers. When the import finishes, the Open profiles button takes you to the profile list.
On the right, the History block shows the last 20 imports: the file, who uploaded it and when, the status (Uploaded, Queued, Processing, Completed, Failed), and the result.
How rows are processed
- If a profile with that identifier already exists, it's updated: new traits are added and matching ones are overwritten. If a row contains identifiers of two different profiles, the profiles are merged. See Profiles.
- Empty cells are skipped and don't erase known values.
- Numbers and
true/falseare saved as numbers and booleans. - Email and phone from the file become both identifiers and profile traits.
- Spaces, parentheses, and hyphens are stripped from phone numbers. Include the country code:
+1 555 123-4567. A number without a country code will be saved with the wrong one. - A row without a single valid identifier is skipped with an error.
The import creates an $identify event for each row, so trait changes can trigger journeys that start on a trait change. If you don't want that, pause those journeys for the duration of the import.
Data sources
A source is a scheduled, recurring import. It's useful when your CRM or warehouse publishes a fresh export every night: OneTrace.pro picks it up and updates profiles or adds events.
Before you start
First, create a connection in Integrations (requires the Administrator or Owner role):
- File by URL: a file at an HTTP(S) address. If the file is protected, enter an authorization header, for example
Bearerand a token. - File from S3: a bucket in AWS, Yandex Object Storage, MinIO, and other compatible storage.
- Google Sheet: uses a Google service account key. Give that account read access to the spreadsheet.
File formats: CSV, JSON (an array of objects, up to 50 MB), and JSON Lines.
Create a source
- Open Data → Data sources and click New source.
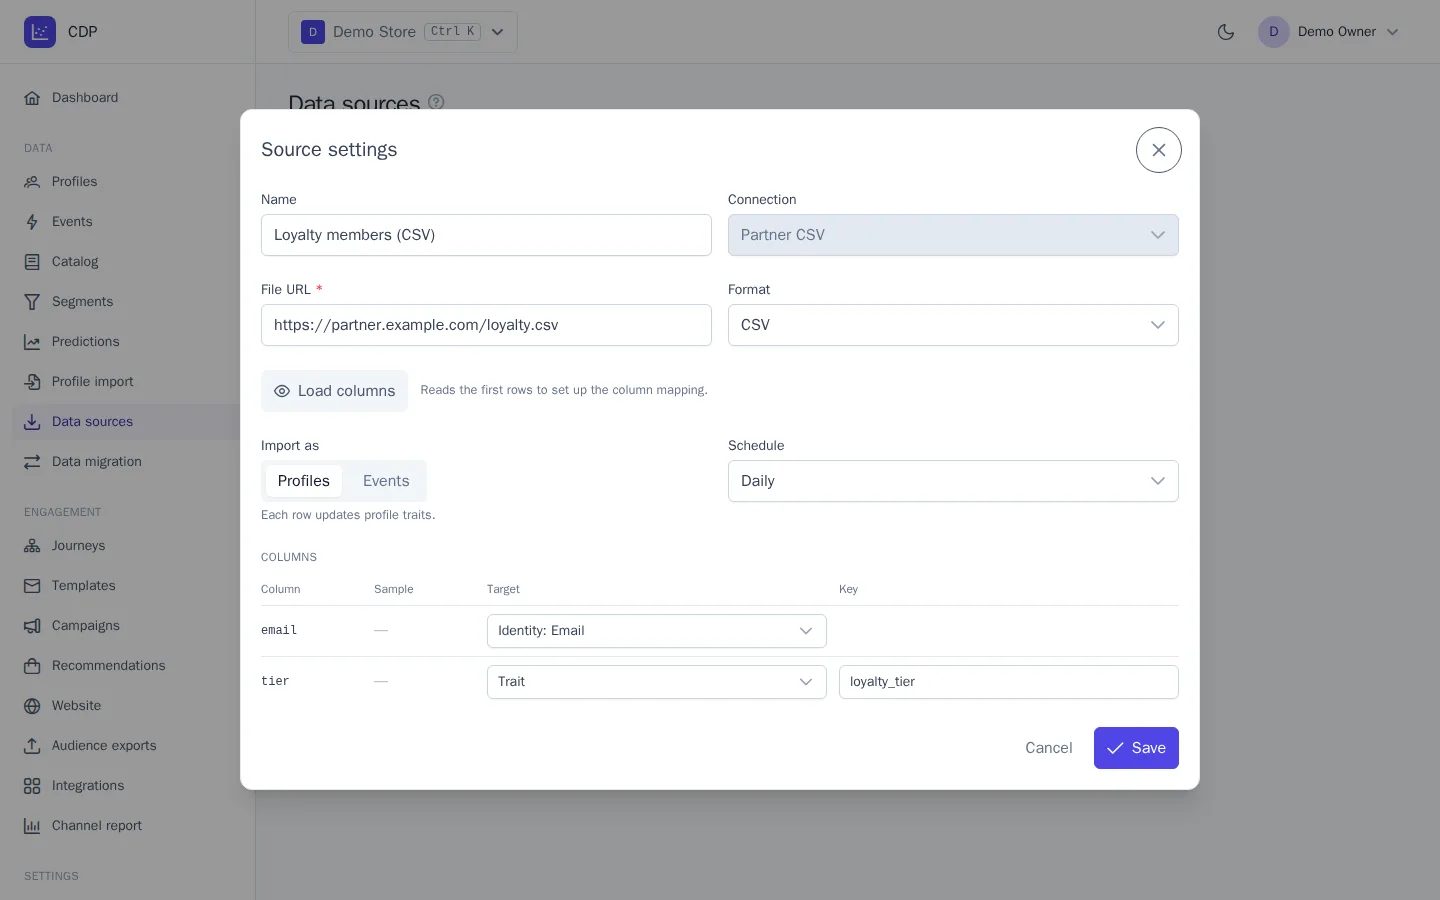
- Enter a Name and choose a Connection.
- Fill in the connection settings: File URL and Format, File path in the bucket, or Spreadsheet ID and Range (for example,
Sheet1!A:F). - Click Load columns: OneTrace.pro reads the first rows.
- In the Import as field, choose Profiles (each row updates traits) or Events (each row is an event).
- Choose a Schedule: from every 15 minutes to once a day.
- In the Columns table, set the target for each column, as in a CSV import.
- Click Save.
For events, the columns table also offers Event name, Event property, and Event time. A time column is required. Set one event name for all rows in the Event name field (for example, order_completed) or choose the column that contains it.
How a source runs
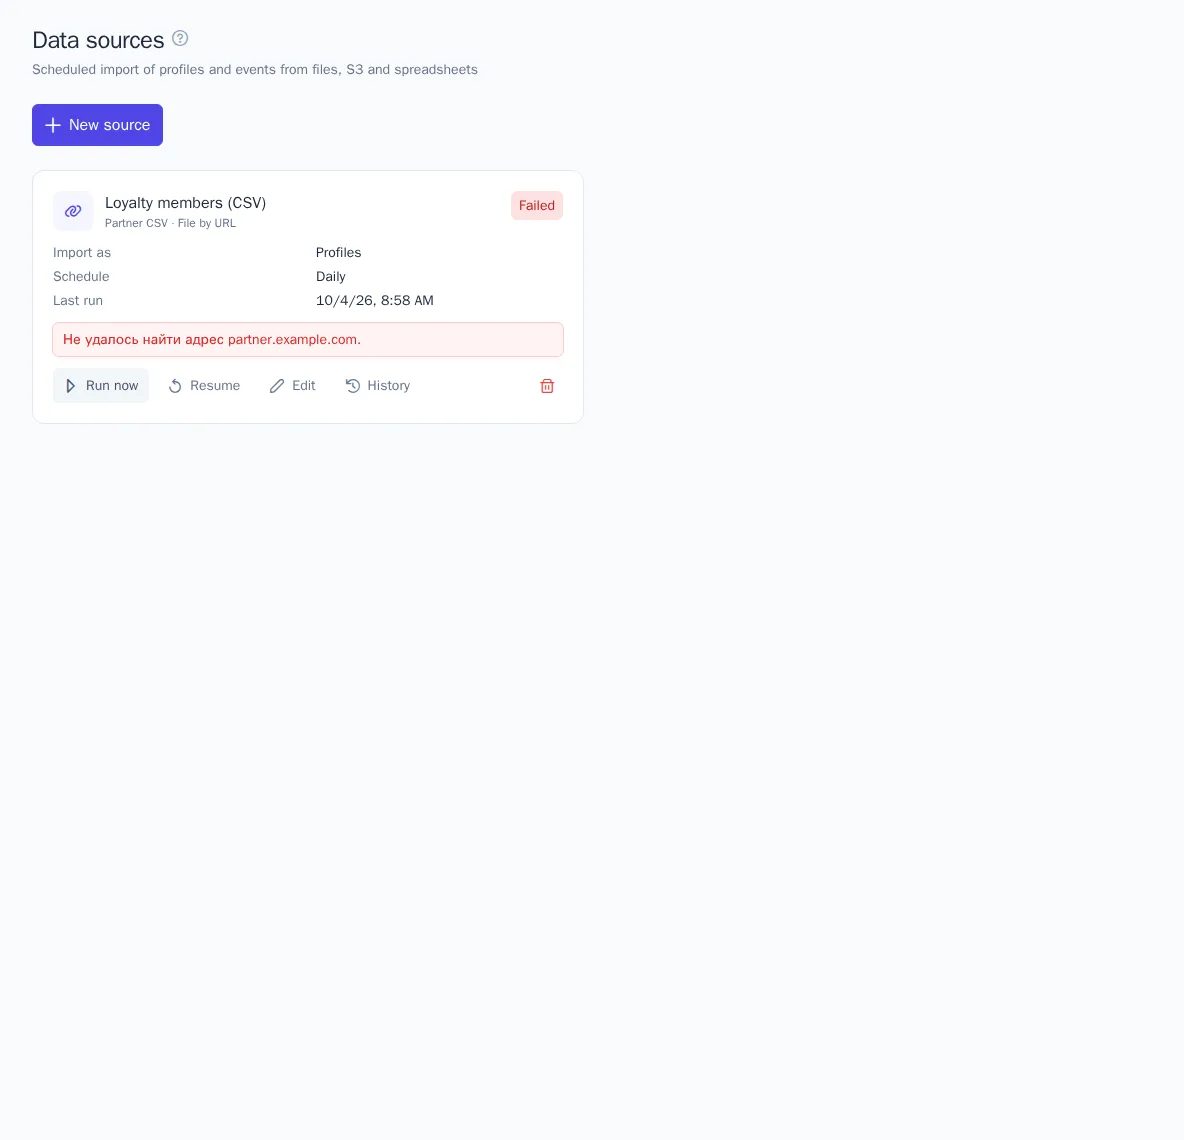
The source card shows the status (Active, Paused, Failed), the schedule, the last run time, and the result: rows, accepted, skipped, and failed.
- Run now starts an extra run. It also brings the source back from a pause or an error.
- Pause / Resume stops and resumes scheduled runs.
- History lists the runs: start time, how it was triggered (Scheduled or Manual), status, and the first row errors with their numbers.
Good to know
- If the file hasn't changed since the last run, the run ends with the Unchanged status and no rows are read.
- Repeating the same row within a day doesn't create duplicates.
- For events, the time of the last loaded event is remembered: later runs skip rows that aren't newer. So you can simply append to a history file.
- A failed source keeps retrying on schedule; the error text is shown on the card.
- Loaded events count toward your plan's monthly quota.
- Deleting a source keeps the data that was already loaded.
For a one-time move from Mindbox and other platforms, including history, there's a separate tool. See Moving from other platforms.