Mobile apps
You can connect your store's Android and iOS app to OneTrace.pro the same way as a website. Events from the app go into the same profiles as actions on the website, in emails, and in stores: segments, journeys, predictions, recommendations, and reports work with them. Through the app you can send push notifications and show messages inside the app.
Everything for apps is in the Apps menu group:
- Connection: the key, the code for the app, push notifications, the installation check, and a test push;
- Report: installations, sessions, app and OS versions, push and in-app message sends.
The section is visible to roles with permission to view the website. A test push can be sent by roles with permission to send messages. In-app messages are available from the Growth plan.
Connecting an app
The Apps → Connection page walks you through the steps. You can complete each next step once the app is already sending events.
1. Write key
The app sends events and registers installations with a write key. You can use the same key as your website or create a separate one with the Create a key button. The write key is visible in the app code, and that is fine: it can only send events. Keys are created by the project administrator.
2. SDK in the app
Choose a platform: Android, iOS, Flutter, or React Native. Two code snippets appear below: adding the library and starting it with your key and address. The address and key are already filled in. The link under the code leads to the full documentation of the library.
The library sends the install, update, app open, and move to the background on its own. Each event carries the app version, device model, OS version, language, and time zone. The rest is called by your app:
- screen: when the user opens a screen, such as a product, the cart, or the catalog;
- event: actions such as adding to the cart, an order, or a favorite;
- identify: after sign-in, with the user ID and their data, for example an email. If the project has a signing key, pass the signature of that ID computed by your app's server as the third argument;
- reset: after signing out of the account.
Send the same events and the same product IDs as on the website. Then recommendations, abandoned cart journeys, and reports work for the website and the app together.
If the page shows a list of API addresses instead of code, the app connects through the API, and your provider supplies the libraries for apps.
3. Push notifications
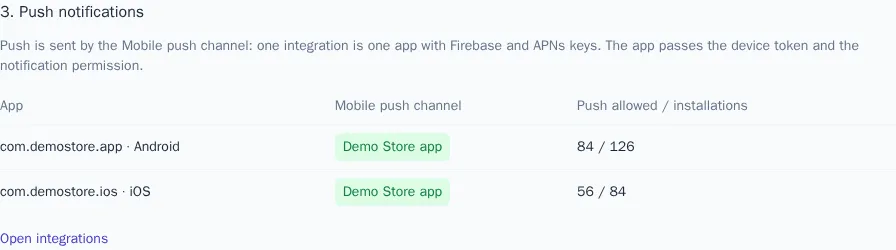
In the app, you need to request the notification permission and pass the device token to the library: the code for the chosen platform is on the page. The table under the code shows the project's apps: whether the Mobile push channel is connected for them, whether they have keys, and how many installations allowed notifications. How to connect the channel is described in Push notifications.
4. Installation check
Launch the app with the library. After a few seconds, a row for the app appears in the Installation check block: the library and its version, the number of installations, sessions, and events in 7 days, and the time of the last event. While there are no events, the section shows "Waiting for events from the app". The check refreshes itself every 10 seconds while the page is open.

Push notifications
Push is sent by the Mobile push channel. One integration is one app: the Android version and the iOS version.
- Open Engagement → Integrations, click Add integration, and choose Mobile push.
- For Android, enter the Android package (applicationId, for example
com.shop.app) and the Firebase service account (JSON): Firebase → Project settings → Service accounts → Generate new private key, then paste the whole content of the file. - For iOS, enter the iOS bundle id, the APNs key (.p8) with its Key ID and Team ID. The key is created in Apple Developer → Certificates, Identifiers & Profiles → Keys with the Apple Push Notifications service enabled. APNs environment: Sandbox for builds from Xcode, Production for TestFlight and the App Store.
- Click Save, then Test on the integration card: OneTrace.pro checks access to Firebase and the APNs key and shows how many installations allowed notifications.
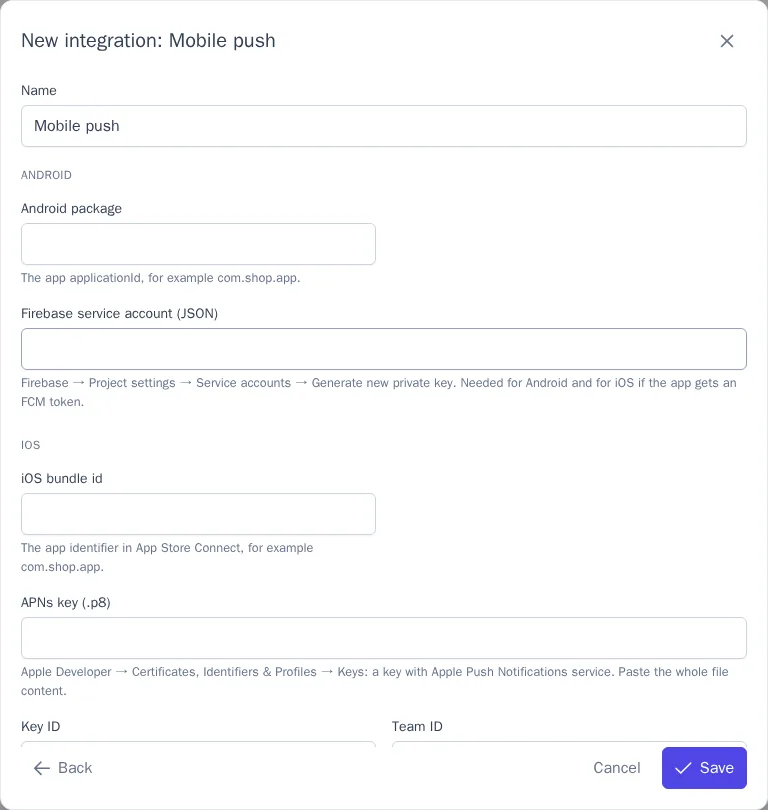
If the app receives push through Firebase on iOS too, the service account is enough: the APNs key is not needed then.
Who receives push. A profile can receive push while the app is installed on its device, the installation has a token, and the user allowed notifications. Allowing notifications counts as consent to the channel. If notifications are turned off in the phone settings, the profile stops being reachable for push, but the consent to the channel does not change. After signing out of the account, the installation passes to the next user, and the profiles are not merged.
What is in a notification. A title, a subtitle (shown on iOS), text, an image, a link on tap, data for the app, a sound, and a badge number. The link opens a screen inside the app (myapp://…) or a website page. Images in iOS notifications are shown by the notification extension, which is described in the library documentation.
What is counted. Sent, delivered (the notification reached the app), opened (a tap on the notification), and link clicks. Push is sent by journeys and campaigns using Mobile push channel templates, like messages in other channels. Subscriptions and frequency are checked by the common messaging rules.
In-app messages
In-app messages are shown inside the open app: a modal in the center, a banner at the top or bottom, or a full screen. They do not need the notification permission. A message is shown once; cards that stay in the app and on the website until they expire are the message feed.
- Connect the channel: Engagement → Integrations → Add integration → In-app messages. You can specify the Android package and the iOS bundle id. If the fields are empty, the messages are shown by any app of the project.
- Create a template for the In-app messages channel and send it from journeys and campaigns.
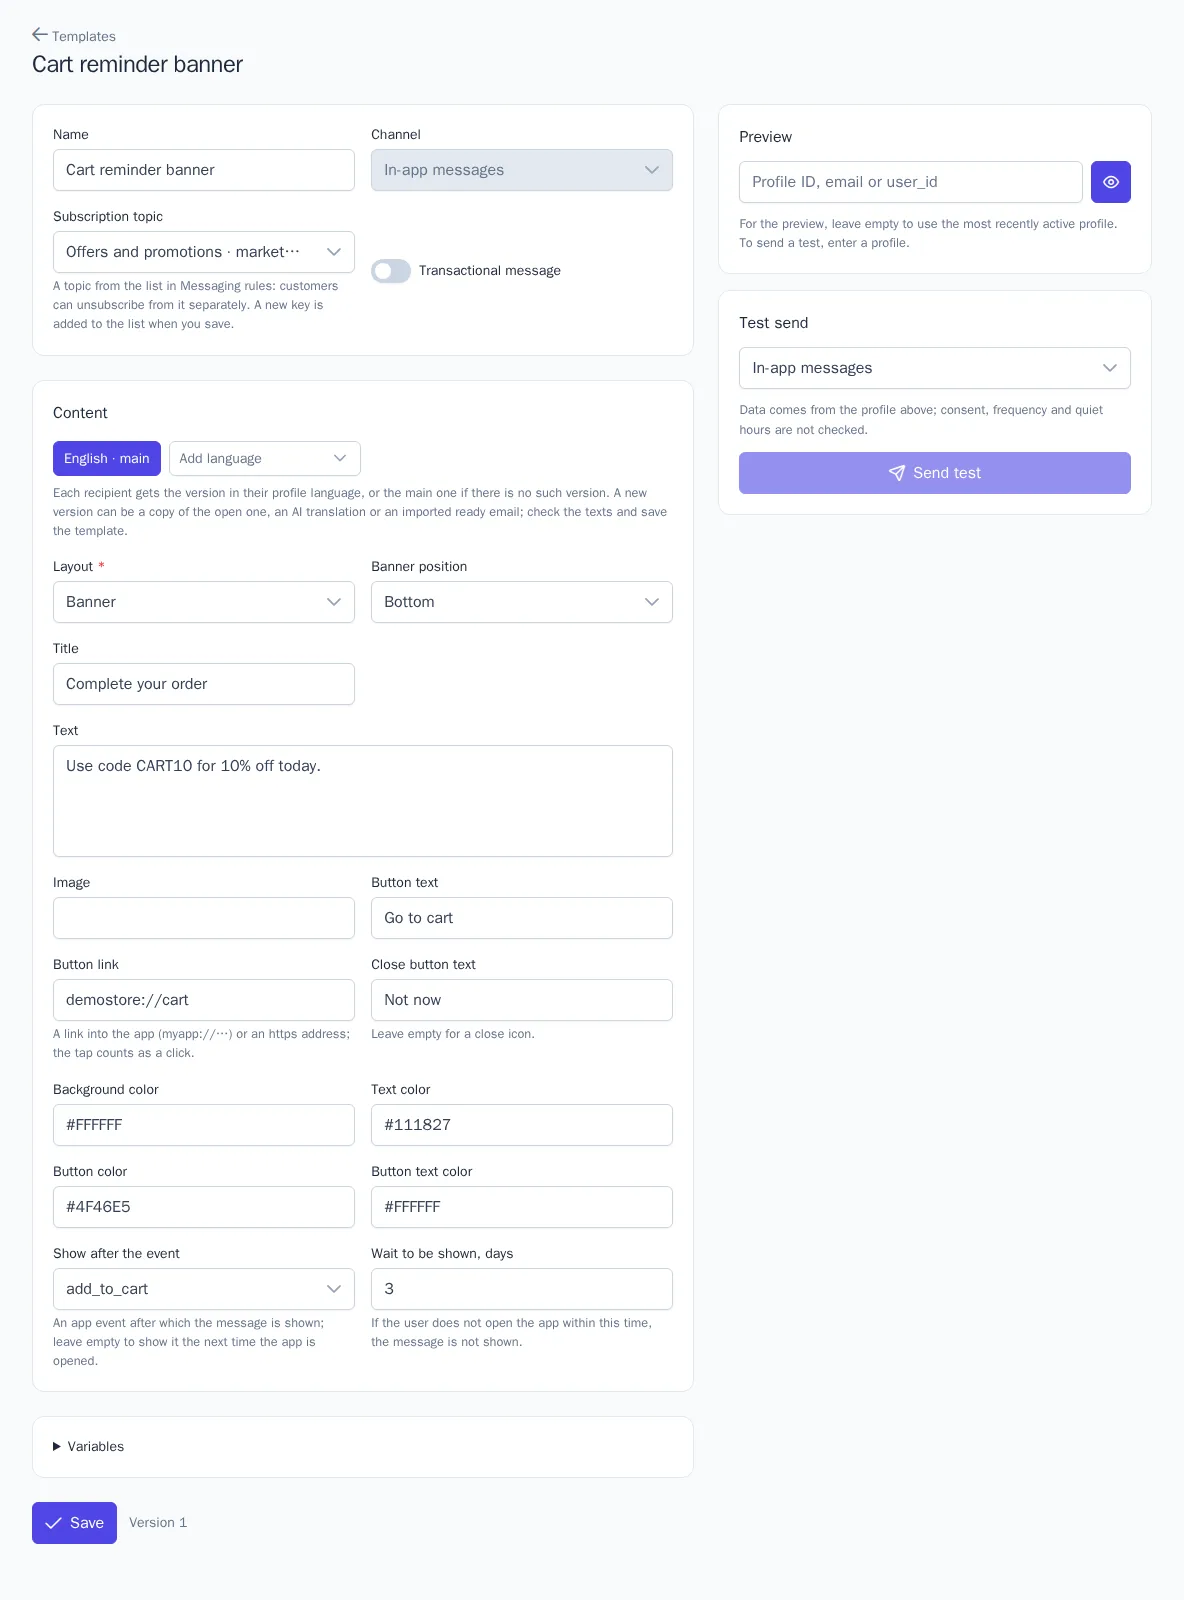
The template has:
- Layout: modal, banner, or full screen; for a banner, Banner position: top or bottom;
- Title, Text, Image;
- Button text and Button link: a link into the app or to a website;
- Close button text: if empty, a close icon is used instead;
- colors of the background, the text, the button, and the button text;
- Show after the event: an app event, for example
add_to_cart. If empty, the message is shown the next time the app is opened; - Wait to be shown, days: from 1 to 30. If the user does not open the app within this time, the message is not shown.
The message goes to a profile that has an app installation. Without an installation, the message is skipped with the reason "no recipient address". The app picks up messages when it opens and after sending events, and shows them one at a time. A banner hides itself after 8 seconds. The app can hold back a message, for example during checkout.
Showing a message counts as delivered and opened, and tapping the button counts as a click. Closing it without a tap changes nothing.
Test push
The Test push block on the connection page sends a notification to one device, which is handy for checking the text and the link on your own phone.
- Choose the App. Below, the installations that were opened most recently appear. Find your installation by user id or installation id: you can show it with a button in the app or take it from the library log.
- Select the installation. Installations without allowed notifications are marked "Push off" and cannot be selected.
- If there are several Mobile push channels, choose the Integration.
- Fill in the Title, optionally the Text and the Link, and click Send.
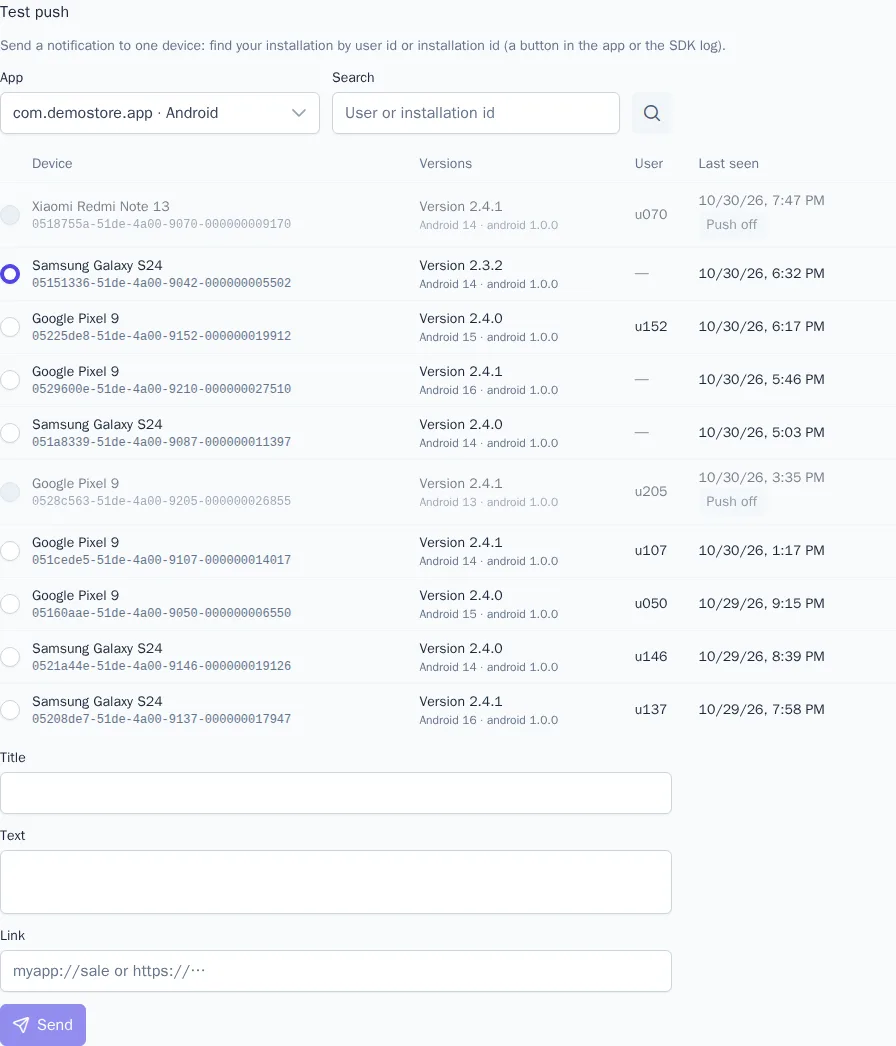
A test push ignores subscriptions and frequency and does not appear in reports. The Message status link shows whether it was delivered. User ids in the list are fully visible only to roles with access to personal data.
App report
The Apps → Report page shows one app on one platform for 7, 30, or 90 days:
- Installations: total, new installations for the period, active installations (opened the app during the period), and the share of installations that allowed push;
- Sessions: how many times the app was opened;
- the By day chart: sessions and active installations;
- App versions, OS versions, SDK versions: how many installations are on each version and how many of them are active. You can see how many users have not updated yet;
- Mobile push: sent, delivered, opened, clicks, and errors;
- In-app messages: shown and clicks.
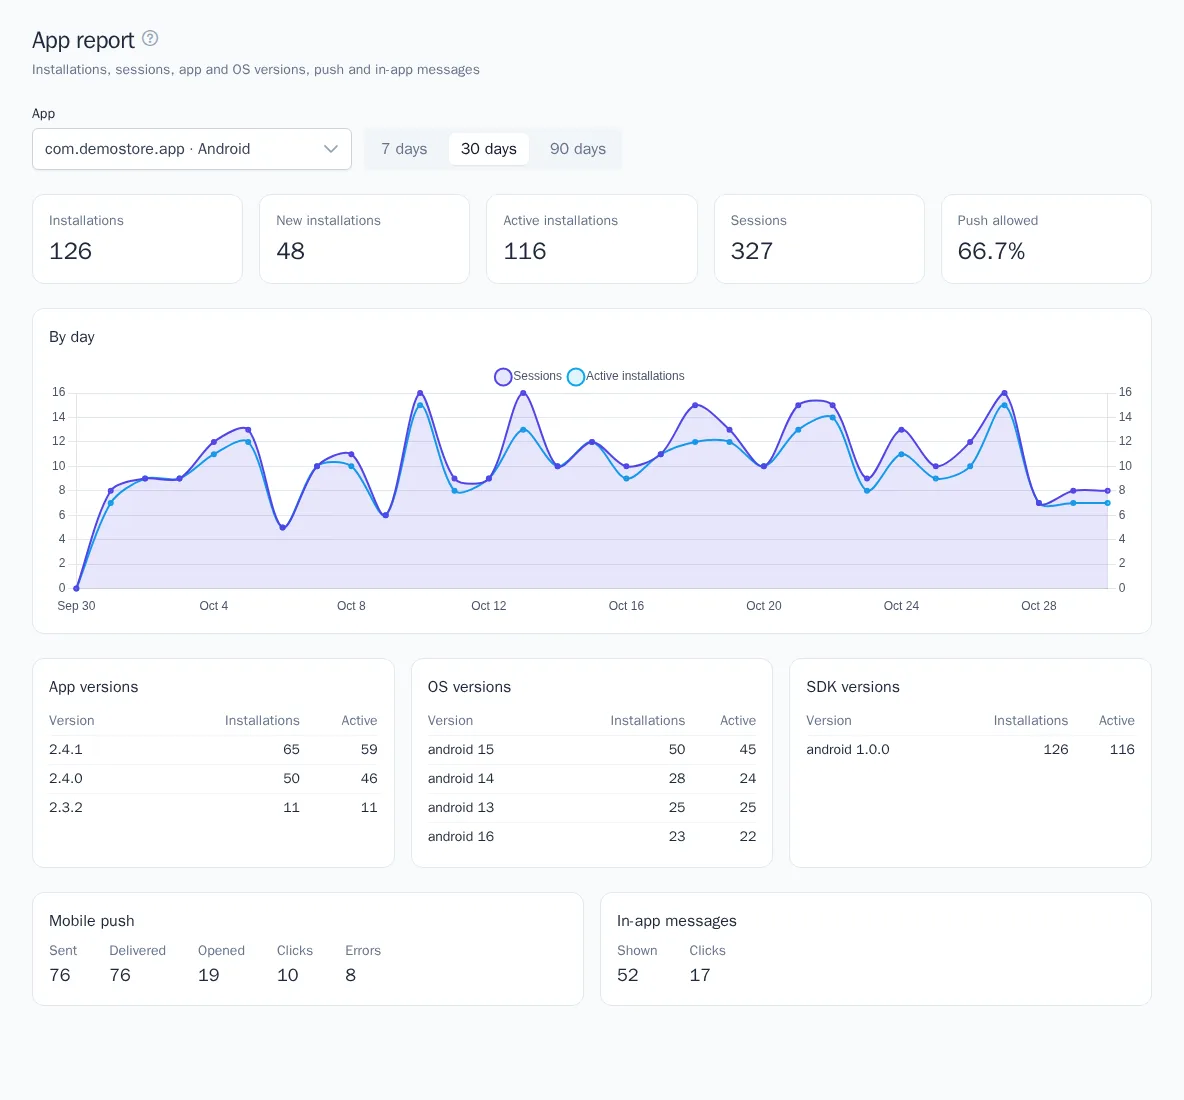
Test messages do not appear in the report. The app and the period are saved in the page address, so you can send the link to a colleague.
Good to know
- An app is identified by the Android package or the iOS bundle id: the Android and iOS versions are different rows in the report's app list.
- A session is an app open or a return from the background. Days in the report are counted in UTC.
- App screens are visible in events and in the profile history as "App screen view". You can build segments and start journeys from them.
- The Mobile push identity in a profile is an app installation with notifications allowed. If notifications are turned off, there is no identity, but events from the app keep arriving.